The Zendrum EXP and Looper Foot Controllers
In my previous post, I examined using the Zendrum EXP with MIDI Foot Controllers, specifically the Behringer FCB1010. Once I got past a byzantine learning curve, I was able to effortlessly control MIDI volume, program changes and the like. It was time to turn my attention to the world of Looper Foot Controllers. Many of the musicians I've worked with are masters of these loopers, and pedal boards; Lexicon, Digitech, Boss and Roland. Their ability to build songs on the fly and in real time was both amazing and daunting. They are not for the squeamish and if not played correctly, can be an unforgiving and unmitigated disaster. That's perhaps the biggest reason I shied away from them, and instead invested my time and energy in one shot samplers, like the Akai S2000. In the old days, I'd load my pre-recorded samples into the Akai with an Iomega Zip drive, and trigger the sample from my original instrument, the Drummstick, and later the Zendrum ZX.
With the arrival of the Zendrum ZX and its onboard MIDI, I could connect it directly to a MOTU, PreSonus, or M-Audio, MIDI interface into a laptop via USB. I could now trigger sampler apps like Ableton and Izotope's iDrum. As the laptops became faster, the latency lower and the apps more robust, I added the Zendrum EXP to my arsenal, and added VST apps like BFD2, and Logic Pro to my MacBooks, an Alesis DMDock for iPad, Alesis DM10 drum modules, and the Zendrum Stompblock.
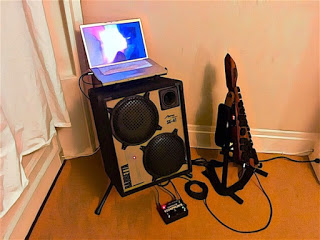
This set-up had served me well for over a decade. The iPad arrived and eliminated the need to always travel with a delicate laptop, and the constant fear of dropping it, someone spilling something on and God forbid, stealing it at a gig. My fellow electronic musicians asked me if I'd reconsidered using a looper pedal board, with the ability to load my entire loop library and build new loops live; "Really great for drum solos and a myriad of other performance possibilities..." Two of my fellow looping masters, 7 String bassist Edo Castro-Woodhouse and guitarist Peter McKibben, gave me advice on which loopers to consider, lent me theirs to play with and tips and tricks on how to perform with them. After a bunch of research, I decided on the Boss RC-300 Loop Station. I was already familiar with a ton of Roland gear; from my early days with the TR-808, TR-505, TD-7, Octopad, V-Drums, keyboards, KD-7, FV-500L, etc...
Would the RC-300 also be as much of a nightmare to program as the Behringer FCB1010? Well, none of these things are intuitive; The manuals are always lacking, features are hidden, and the whole process can be frustrating. Thank God for all those YouTube tutorials, and user groups! Before I got started on the RC-300 and needed to get my samples ready.
My one-shot samples have been the heart of my set-ups since 2001, so importing them to the RC-300 was my first task. After a trip to the Roland/Boss website, I learned I needed to download the drivers for it and the Boss Tone Studio Library. Installation was easy on my MacBook Air; Next, I need to get the samples ready. All of my samples are .AIF files; They do not work with the RC-300. I not only had to convert them to .WAV files, I also found that all those mono files needed to be mixed down to stereo. Out of 55 samples, the RC-300 only accepted 10 of them, and responded with "Unsupported Format!" messages. That was a bummer. I discovered that those samples had "meta-tags" and in their previous lives they may have been MP3s, .AIFs, FLACs, etc. They needed to be reformatted. I tried a bunch of apps, Sound Studio, Audacity, Wondershare, etc. None of them seemed to work. Perhaps I was doing something wrong, as they apparently worked for others but not me. Turns out I wasn't alone, and via one of the Boss user groups I learned about "MediaHuman Audio Converter". Voila, the RC-300 loved them, and my 55 samples were all in!
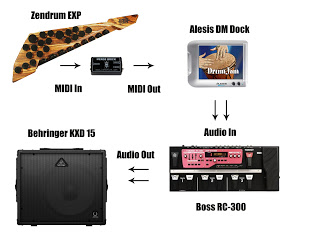
The RC-300 has 3 tracks per preset, and you can use the first 89 presets; The other 90-99 presets are factory demos and the like. That's about 267 total user loop tracks you can work with, and the RC-300's built in Rhythm tracks are a nice plus; (There are a bunch of them, and in a variety of time signatures and styles; jazz, rock, pop, etc. I'm never going to use them, although guitarists, bassists and vocalists do use them). I loaded all of my samples into the first 55 presets. They are permanently stored in the RC-300. With the Zendrum EXP routed into the instrument input of the RC-300, I can start the loops by tapping Track 1, and add live loops to Track 2, and Track 3. These are not permanent; once you power off the RC-300, the live loops are gone, and you can start anew the next time you boot up. Theoretically you can even do the same with Track 1; The loaded loops are safely written and can't be wiped out unless you delete them.
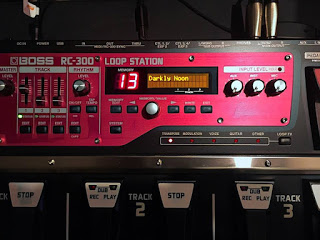
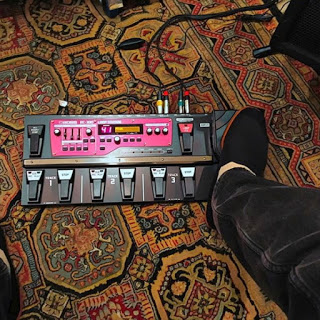
Once I figured out how to assign the onboard volume pedal (EXP1) to the tracks, I was all but good to. I tediously set about assigning the pedal to each of the presets, and named them all. I was just about to invest in another Boss expression pedal to scroll through all the presets, when I discovered a way to do it, once again from the user group, (Hold down the "Loop FX" pedal for 2 seconds, and use the "Dub-Rec-Play" pedal of Track 1 to go up, and the "Stop" pedal of Track 1 to go down. Tap the "Loop FX" pedal once to exit!)
Looking forward to performing live with the RC-300 this weekend; It's already survived its "Baptism of Fire" with a bunch of live jams. There are ton of other features in this thing, I'm still getting to know it, but it pretty much does what I need it to do; Start, stop, build and fade the loops; Built in reverb, Aux, Mic and stereo Instrument inputs with volume knobs; Individual volume sliders for each track, and a sturdy housing. The price tag is hefty $550, but it's Boss' best looper pedal board, and so far, I haven't had any regrets. See you out there!
The Zendrum EXP and MIDI Foot Controllers
I'm psyched to be starting off 2019 with new projects, like John Wubbenhorst's Facing East with Tom Canning and Steve Zerlin; and Jason Everett's Deep Energy Orchestra with Trey Gunn, Fareed Haque, Radhika Iyer Phil Hirschi, Rachel Nesvig, Aleida Gehrels and Chaz Hastings! Playing with these great musicians requires not only lots of shedding, but also updating my live Zendrum set-up with some new gear.
Gone are the days when I needed a rack full of gear, like an Alesis D4, Alesis DM Pro, Akai S2000 Sampler, and effects like Yamaha Rev 100 or Alesis MIDIverb, and a Mackie line mixer. The modules soon gave way to laptops, stocked with VSTs, and the gear has gotten smaller, like the new Zendrum Stompblock. The iPad Pro has supplanted my MacBook Pro and MacBook Air, and the new keyboard amps that come with built in EQ and effects have all but replaced all those heavy, powered speakers and rack mounted mixers.
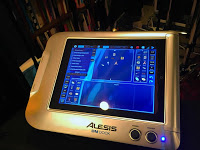
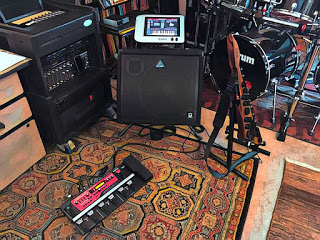
The newest addition to my set-ups are MIDI foot controllers and loop stations. I'll take a closer look at the loop stations in my next blog, specifically the Boss RC-300. For now, I'll examine the Behringer FCB1010 MIDI Foot Controller. I'd already been using Behringer gear; Mixers, etc. When I switched to the iPad, I used the Behringer iStudio iS202 interface. That worked great, but it was older and doesn't work with newer, lightning connector iPads, so I had to switch to the Alesis DM Dock which comes with adapters for both. The iPads were loaded with percussionist extraordinaire Pete Lockett's fabulous "DrumJam" app, hands down the best percussive app I've ever used. With my MacBooks, I used BFD2 with the Billy Cobham/Ken Scott samples. I loved them a lot, and gladly installed them in the Zendrum Stompblock, and later when I was pleasantly surprised to get SampleTank for iPad, also with Cobham/Scott samples. FYI: They only work on newer iPads. DM Dock to the rescue again!
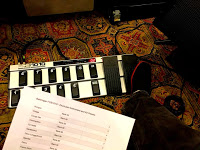
In the old days, I used a MOTU Firewire MIDI interface, with an expression pedal to control the volume via MIDI, so I was familiar with MIDI Control Change messages (CC #7 for volume). After a bunch of research I settled on the Behringer FCB1010. After struggling to figure out how to get it to work, (a major complaint of reviewers), I turned to YouTube and happily found a ton of tutorials that solved my problems. I connected it to the DM Dock and voila, MIDI volume control was enabled! To my surprise the Up/Down pedals allowed me to scroll through all of the kits and drums in the DrumJam app. I immediately connected my Alesis DM10 modules and it also enabled me to change kits with the touch of my toes!

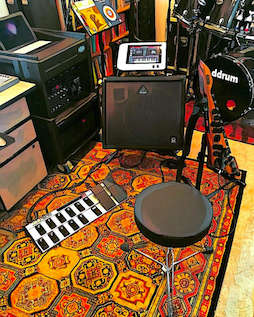
The Zendrum EXP/DM Dock Live Set-up |
As a stand alone MIDI foot controller, the FCB1010 works great for me, however guitarists, bassists and others may have an entirely different view; Changing patches and effects may be a real challenge, and many folks I know have given up on it, cursing it's complicated hierarchy. Figuring this stuff out isn't very intuitive, but if you can get a grip on that, you may be able to unlock its potential.
As an electronic percussionist, it's great to be able to go from a drum kit, to a kanjira, or a marimba with a tap of my toes. But this percussionist doesn't live by kits alone. I use a ton of samples and loops in more than a few groups. I used able to to that with an Akai sampler, and later with a sample filled laptop and an Audio/MIDI USB interface. That however, was challenging with just the iPad. The answer apparently lies in the brave new world of the MIDI loop stations by Roland/Boss, and Digitech. I'll share my discoveries in my next blog.
Building the Mapex “Billy Cobham 20th Anniversary Custom Kit”
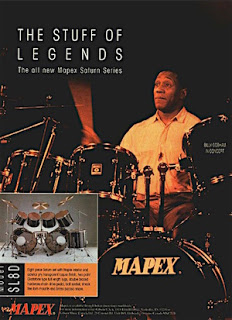
In 1991, drummer Billy Cobham became one the newly formed, Mapex Drum Company's best known endorsements and consultants, between his previous deal with Tama Drums, and before he subsequently signed with Yamaha. Cobham was soon seen playing Mapex kits on tour with a variety of live acts: With Peter Gabriel, Terje Rypdal, Wayne Krantz and many others. A 1994 customized, Emerald Green Mapex kit that he once used with Gabriel was recently seen on eBay for a whopping $10,000, and listed a “Certificate of Authenticity” signed by Cobham himself. The CoA listed each drum, and even included a previously sold, nearly identical, Cherry Red Mapex kit that Cobham would also use whenever he needed to leap-frog from venue to venue to save time setting up his monster kit. That maple kit was a bit too pricey for me to say the least, and to be honest, I was never fond of how those vintage Mapex "low mass" drum lug and rod systems really looked. Nevertheless, Mapex had revolutionized the world of drums in the early '90s by coming up with a “low mass, single point” tom lug to minimize the vibrations that typical drum lugs and mounts employed. Mapex would ultimately eliminate the rods and change all of their drums with only the low mass lugs; a trend that even Yamaha, Ayotte and others use to this day.
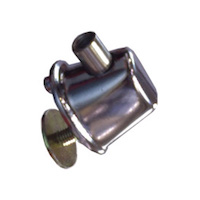
Mapex "Low Mass" Lug |
Cobham played maple drums from Mapex’ “celestial” series; Saturn, Orion, etc. Later, Mapex would add the Mars, Venus, and Voyager series. Cobham’s kit featured 5 power rack toms: 15”, 14”, 13”, 12” and 10”; 3 snare drums: 14” x 10”, 13” x 4”, 14” x 7”; 3 bass drums: 24", 22” and 20”, and two floor toms: 16” and 18”. After years of setting up his rack toms traditionally high to low, Cobham continued to experiment with yet another approach during his tenure with Mapex.
Cobham live with Peter Gabriel in 1994 |
With Tama, Cobham added multiple snare drums, triple bass drums, octobans, a gong drum and even a modular drum rack system. However it was while drumming with Mapex that Cobham began arranging his toms in what he called his “tonal array”. From his left to his right, Cobham ordered his rack toms in an alternating sizes; 15”, 13”, 14”, 12” and 10”, or 15”, 13”, 14” and 12”. Cobham’s open-handed patterns, and his desire to constantly evolve and grow, also challenged him to avoid the cliched high-to-low drum fills we’d all become accustomed to. Cobham has kept that unique approach to this day, using a 15”, 13”, 14”, 12” and 10” tom set up with a 16” and 18”, and occasionally adding a 12” snare, and 8” tom.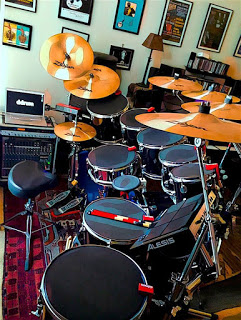
The hybrid Ddrum kit |
I’ve already been experimenting with a similar set-up with my hybrid acoustic-electric Ddrums for some time; Re-wrapping them; adding new Evans blue hydraulic and coated heads, and a modular Gibraltar rack system. As you can imagine, breaking that kit down and moving it back and forth could be a challenge, so like Cobham and others, I’d keep the Ddrums at home, and decided to make a Mapex live and studio rig, with all the drum and hardware cases already assembled. The Ddrums looked gorgeous with their custom-made badges, new wraps, heads, and Gibraltar hardware, and since I’ll soon be going out on the road, something needed to be done. So, with my replica Yamaha Billy Cobham Signature Snare drum project awaiting more parts, I turned my attention to my assorted collection of orphaned Mapex drums. Cobbled together from finds on eBay, Craig’s List, Guitar Center and Reverb, my Mapex kit really needed a "MyDentity" makeover. Once again I looked to Cobham for inspiration and after discovering his history with Mapex, I thought about how to re-create his set-up, based on Cobham’s years with Mapex, Yamaha and Tama. Well, if Tama could make an anniversary kit for the great Simon Phillips, I could do the same for the Mapex/Cobham kit. I got my first Mapex drum back in 2011, which coincidently was about twenty years after Cobham and Mapex first got together; With that in mind, the idea of a commemorative, one-of-a-kind “Billy Cobham 20th Anniversary Custom Model” drum set really appealed to me...
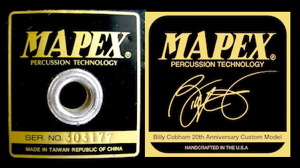
The vintage Mapex and the "20th Anniversary" badges |
My Ddrum kit also took some customizing and assembly, due to some of the sizes needed, so I was no stranger to what lay ahead. For the badges, I looked at the Mapex kits Cobham used; They had the classic Mapex 2” x 2”, black and gold, vented badges, seen on most of the surviving photos of those kits from that era, with the exception of his custom “U.S. Maple” kit he used with Peter Gabriel. That brass badge was 3” x 1.5”, however my Mapex kit wasn’t all maple and I didn’t find that badge all that attractive. Based on the aforementioned black and gold badge, and the Saturn and Mars badges, I decided to use that design, without the vent, featuring Cobham’s Yamaha Signature and the Mapex “Handcrafted in the U.S.A.” slogan. After a little bit of Photoshop, an order was placed to the folks at PlaqueMaker, and the new badge would be made. Next, it was time to assemble the rest of the drums I needed for the project.
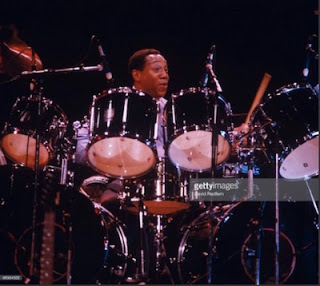
Cobham live in Cannes, France 1989 |
Since I decided that I would configure the Mapex kit just like Cobham’s modern drum set-up, I needed to do a little more research. To do that, I found his old profile on a Yamaha website, as well as his new one on the current Tama website. I also found Cobham’s equipment riders for his 2008 Spectrum 40 band, his European live bands, and his solo performances. While my replica Yamaha Cobham Signature snare being built, I seemed to recall that Cobham didn’t always use it live; (He doesn’t use it with Tama), and in researching his riders, I noticed that he always requested the now classic Yamaha 14” x 6.5”, SD-4106 brass snare. Well, those snares are are discontinued and hard to find, plus, this needed to be a Mapex. Now, which brass Mapex snare did Cobham use back in the day? Turns out he used an assortment of them, and in a wide variety of sizes. Mapex made a monstrous, 14” x 8” “Brass Master” snare that Cobham used quite a bit, before moving to smaller sizes. An 8” snare is too much for me, so I needed to find a brass snare comparable to the Yamaha. 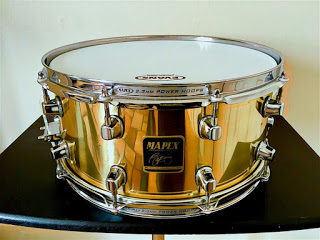
14" x 6.5" Mapex BR4665 with custom badge |
Turns out there was; The Mapex BR4665. After a bit of a search, I finally found a brass 14” x 6.5” snare with matching low mass lugs. The only other drum I needed was the ever challenging 15” x 12” tom. Most drum companies offer your basic kit sizes; 22, 10, 12, 13, 14, 16 inch, shells. You’ll get the little 8”, and the big 18”, but the 15” is the exception. No worries; tons of folks make these out of the Keller maple, so I had one made. I managed to buy a bunch of low mass lugs on eBay, and got more wraps from Jammin’ Sam in Arizona. I'd already stripped a 12" x5” Pearl Firecracker snare of its hardware to make a new 12" x 5.5", and a Mapex MPX 14” x 5.5” snare, I decided to give them a chrome facelift from Sam too. Cobham once said that a great player can make almost any drum sound good, but it helps to add the best drum heads you can. I added the same heads Cobham uses; Evans G2, Hazy Snare Side 200, etc. With the drums assembled, I started thinking about the mounts. The Mapex L-Mounts were okay, but they weren’t suspension mounts. I’d had RIMS and Gibraltar systems before, and I happened to have one of Gibraltar's new Universal mounts, so I thought I'd give it a try. Unfortunately, the Mapex tom mount brackets didn't work with Gibraltar's system or any of the other suspension plates! The top plate holes didn't line up with Mapex's triangular configuration. It seemed I had only a few choices: Either get a new suspension system and mounts, or return to the original mounts and give up the whole idea of a suspension system. Actually, there was another alternative...
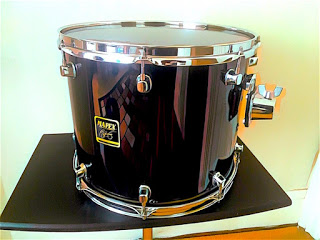
Mapex Maple 15" x 12" with Yamaha YESS Mount |
While sifting through my containers of drum parts, I came across a Yamaha tom bracket and on a whim, I matched up to the holes on the Mapex shell. Surprisingly, they lined up perfectly! Now in recent years, Yamaha had incorporated their hexagonal toms brackets to their unique suspension system; "YESS". These new Yamaha mounts attached to the shell in only two places, with a stand-off on each bolt; Less intrusion on the shell and for much better resonance. These were also the same mounts used by Cobham on all of the Yamaha kits he played during his tenure with them. I'd managed to track down a bunch of Yamaha's "RK-TT" retrofit kits, so I was able to convert my old Yamaha brackets to YESS mounts; For now, the problem was solved. They weren't Mapex, but they definitely work. Well, if they were good enough Cobham...
Next, I delicately removed all of the various Mapex badges from the drums and cleaned away the residue to make way for the new, custom badges; Silver badge for the chrome snare, and gold for the brass snare and the rest of the drums. It was time to affix the new badges, new Evans drumheads, and Yamaha TH904A tom mounts for the cymbal stands. The vintage Mapex "Billy Cobham 20th Anniversary Custom Kit" was now complete!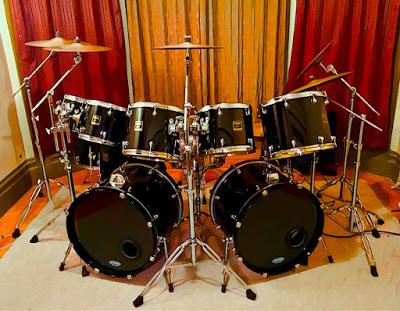
Building the Yamaha Billy Cobham Signature Snare Drum
Well gentle readers, it's been awhile since my last post, but now that 2018 is here, I'm ready to roll! Being an artist, and a man who likes to work with his hands, I’ve managed to build more than a few drum kits from scratch, as well as several snare drums. To date, I’ve restored 2 vintage 14” x 5.5” Gretsch maple snare drums; a 14” x 5” Ddrum birch snare; a Yamaha 14” x 6” Mahogany Rock Tour snare; and a 14” x 5.5” Mapex maple snare drum. Finding parts on ebay, adding new wraps from Jammin’ Sam in Arizona, and new Evans drum heads have breathed new life into these aged beauties.
Being a fan of drummer Billy Cobham, I always dreamt of owning one of his Yamaha Signature snare drums, however they are now discontinued and the $1000 price tag for this collector’s item now seemed a bit much. Having previously built all of these snare drums, I wondered; Could I actually make my own Cobham signature snare from scratch? To quote the Watergate prosecutor Jill Wine-Banks, “I think I could…”
Cobham’s Yamaha Signature snare was a 14" x 6", 6 ply maple drum; That’s thinner than most snares and not particularly easy to find, as most Keller VSS shells come in a thicker or thinner ply, like 5, 7, 8, or 9, and smaller or larger depths, like 14” x 5.5”, or 14” x 6.5”. Fortunately both drumMaker and Precision Drum could make them to order.
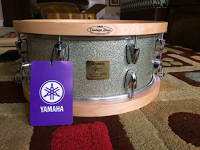
Cobham’s signature snare drums came in either a Silver Sparkle, or Black wrap, so I decided on the Silver Sparkle version. A quick call to Jammin’ Sam for a 14” x 6” JS Sparkle wrap was in order; With all the tools, clamps, drills, bits, and a template from drumMaker already at my disposal, it was now time for the fun part; identifying and acquiring the authentic parts to this discontinued, classic drum…
In order to faithfully build this snare drum, I needed to gather the rest of the authentic Yamaha parts. They weren’t easy to find, but I patiently combed ebay, Salt City Drums, Drum Factory Direct, Drum Center of Portsmouth, Lone Star Percussion, and Reverb to assemble them all. I already had an old Yamaha tom that I was able to strip twelve Absolute lugs from, so I only needed to get an additional 4 lugs from Salt City Drums. A complete list of all parts I needed to find and gathered are listed here:
14” x 6”, 6 Ply Maple Shell with Snare Bed and Bearing Edges
14” x 6” JS Silver Sparkle Wrap and Chrome Vent
Yamaha XH8 14” 8 Lug, 19 Ply Vintage Wood Hoop Snare Top
Yamaha X8HS 14” 8 Lug, 19 Ply Vintage Wood Hoops Snare Bottom
16 Yamaha U0031051 Lugs
16 Yamaha U0035660 5mm x 14mm Hexagonal Lug Bolts
16 Yamaha 50mm Tension Rods
Gibraltar 14” Extended 20 Strand Snare
2 Yamaha U0200350 Snare Guide Assemblies
Yamaha U0200970 Adjustable Snare Butt
Yamaha U0201211 Snare Throwoff-Strainer
14” Evans G2 Snare Batter Head
14” Evans Snare Side 200 Head
2” x 2” PlaqueMaker Brass Replica Yamaha Badge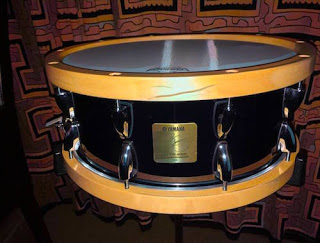
I'd already converted my 14" x 6", 8 Ply Yamaha Rock Tour snare to resemble Cobham's black snare, with Gibraltar wood hoops, faux Yamaha taillight lugs from WorldMax, and a basic Yamaha strainer. It sounded good, but it wasn't in the same league as a real Cobham snare; For one thing it was an 8 Ply drum; 6 Ply Mahogany with 2 Ply Ash, and had 10 lugs instead of 8. I had recently recorded a few tunes with it at 25th Street Recording in Oakland, and as nice as it was, I could tell it wasn't a maple snare. I needed a snare that was more versatile; I needed the warmth, the sustain and the depth that could only come with 6 Ply maple using the best Yamaha parts.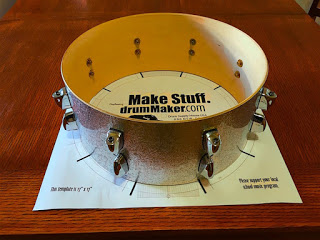
So, with all of parts gathered, it’s time to put all the authentic pieces together to create that Yamaha Billy Cobham Signature snare drum sound! It was a little tricky to find a 14" x 6", 6 Ply maple shell; There were tons of 14" x 6"maple shells to be had, 5, 7, 9, etc; but not 6 Ply. Fortunately for me, Andy Foote of drumMaker was able to help. I placed an order for a Keller VSS shell and I was good to go. When it finally arrived, I got to work on it right away. I laid out all of the lines for the Yamaha Absolute lugs, and drilled the pilot holes the lug nuts. Next, I added the JS Silver Sparkle wrap from Jammin' Sam, and installed the Yamaha lugs. With the holes all drilled, I added the last of the Yamaha hardware; the Yamaha strainer wires, throw-off, adjustable butt and extended roller guides; Perhaps the most challenging part of the entire project. The only thing left was the Yamaha Vintage wooden hoops and the Evans snare heads. After a bit of tuning, the sound of that maple shell began to reveal itself; Crispy, yet warm; bright and woody- Just as Cobham intended. Really looking forward to performing and recording with it, and adding it to the rest of my kit...:)
John McLaughlin's Warfield Farewell; Walter Kolosky's Mahavishnu ebooks
Friday, December 8th at San Francisco’s Warfield Theater, saw the penultimate performance of the legendary jazz guitarist John McLaughlin. Following his final show in Los Angeles the next night, McLaughlin officially retired from all live performances in America, ending this tour with his stellar 4th Dimension band. It was a bittersweet show indeed, however McLaughlin didn’t disappoint his fans, closing out his career with an incendiary outing of music both old and new alongside bassist Etienne Mbappe, keyboardist/drummer Gary Husband and drummer percussionist Ranjit Barot. Earlier in the show, McLaughlin recalled his 1981 performance at the theater with the late guitarist Paco De Lucia, Al DiMeola, and their memorable live album “Friday Night in San Francisco”, described by jazz author and critic Walter Kolosky as “a musical event that could be compared to the Benny Goodman Band’s performance at Carnegie Hall in 1938; And may be considered the most influential of all live acoustic guitar albums…”
I count myself among those fortunate enough to have witnessed McLaughlin numerous times and might I add, in a variety of incarnations since the early 1970s. From my first concert with his Mahavishnu Orchestra at Washington, D.C.’s American University (and later on my birthday at Constitution Hall that December); his subsequent Mahavishnu lines ups with Jean-Luc Ponty, Narada Michael Walden, and Ralphe Armstrong; The original Shakti with Zakir Hussain and Al Shankar; organ trios with Joey DeFrancesco and Dennis Chambers; his One Truth Band, his trio with Kai Eckhardt and Trilok Guru; seeing his Remember Shakti tour in Montreal; and so many, many others.
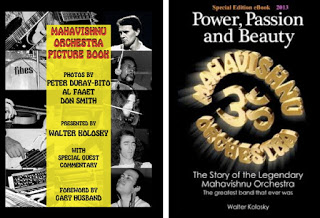
Longtime McLaughlin biographer Walter Kolosky has now released a pictorial follow up to his previous and critically acclaimed book “Power, Passion and Beauty – The Story Of The Legendary Mahavishnu Orchestra”, entitled “The Mahavishnu Picture Book”. This new “ebook” features a foreword, written by the aforementioned, master musician Gary Husband. “The Kindle book contains more than seventy impactful and inspiring never before seen images of the band, and the histories behind them. Also included is special commentary from members of The Mahavishnu Orchestra, Sean Lennon, Steve Lukather, Neal Schon, Chick Corea, Mario Batali, Jon Anderson, Todd Rundgren and many others. The Kindle book also contains bonus pictures, extras, and an exclusive — the only known audio interview, never before heard, of the original Mahavishnu Orchestra!”
Kolosky’s first book has also been updated and released as an ebook; “The Mahavishnu Orchestra, founded by guitarist John McLaughlin, was the first band to fuse jazz, rock and world music into critical and commercial success. The Special Edition eBook “Power, Passion and Beauty” is the updated version of Walter Kolosky’s critically acclaimed work first published in 2006. The Special Edition eBook is brand new to those who have not read the original printed version of this riveting story. For those that have, many new anecdotes, insights, opinions, and an extra chapter updating the story of Mahavishnu have been added. The list of those sharing their views and memories of Mahavishnu for the original book was staggering. Herbie Hancock, Joe Zawinul, Pat Metheny, Sir George Martin, Jeff Beck, all of the original Mahavishnu members and almost 150 others helped tell the tale. This time around, Carlos Santana, Chick Corea, Steve Howe and many other noted artists, producers, audio engineers and spiritual travelers join in to add their views….”
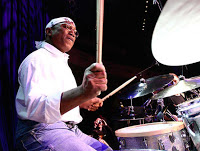
Both books, are a must have for McLaughlin/Mahavishnu fans, the latter featuring footage in both black and white, as well as color; many by the photographers Peter Duray-Bito, Al Faaet and Don Smith. Seeing McLaughlin’s double-neck Gibson guitar, Billy Cobham’s classic clear plexiglass Fibes drums, and Jan Hammer’s vintage keyboards were worth the $10 price tag alone. Coupled with photos of Narada Michael Walden, violinist Jean-Luc Ponty, and the rest of the second incarnation of the Mahavishnu Orchestra were an added bonus. Perhaps just as intriguing was the commentary by so many of the Mahavishnu’s fellow musicians, fans, and photographers who candidly recalled that era, bringing so many memories back to life.
I’ll always carry with me my own memories of those bygone, yet unforgettable shows by McLaughlin’s Mahavishnu Orchestra; they made an incalculable impression on me and so many others, and changed the way we looked and listened to music. For more info on Kolosky’s books, photos, and informative podcasts, you can visit http://www.walterkolosky.com/.